Creating custom Side Menu using DrawerNavigator in React Native
DrawerNavigator is an another type of navigator option in React Native which is used to build a Side Menu with navigation.
Suppose if your mobile application has a lot of screens and you wanna navigate to each screen directly by clicking menu items there you need a drawerNavigator.
It gives you a Side Menu like a drawer. It can be open and close by programmatically.
1.Creating screens
Here we are creating a Home and Profile Screen. We are gonna create a Side Menu that is used to navigate between these screens.
import React from "react";
import { View, Text, Button, StyleSheet, Image } from "react-native";
class Home extends React.Component {
  static navigationOptions = {};
  render() {
    return (
      <View style={{ flex: 1, backgroundColor: "#81ecec", justifyContent: "center", alignItems: "center" }}>
        <Text>Hello!!! This is Home screen</Text>
      </View>
    );
  }
}

class Profile extends React.Component {
  static navigationOptions = {};
  render() {
    return (
      <View style={{ flex: 1, backgroundColor: "#81ecec", justifyContent: "center", alignItems: "center" }}>
        <Text>Hi!!! This is a Profile screen</Text>
        <Image style={{ width: 50, height: 50 }} source={{ uri:"https://facebook.github.io/react-native/docs/assets/favicon.png"}}/>
      </View>
    );
  }
}
export default Home;


2.Creating simple side menu drawer
First i am gonna import DrawerNavigator and then export DrawerNavigator component.
DrawerNavigator accepts first argument as an object or a function.This object with key-value pair.
// ... other code from the previous section

import { DrawerNavigator } from "react-navigation";

// ... other code from the previous section

export default DrawerNavigator(
    {   Home: { screen: Home },
        Profile: { screen: Profile}
    },
    {
      drawerWidth: 250
    }
  );

Here you can see, DrawerNavigator created a side menu drawer with screen name and navigation options.When you click on the names it will redirect to corresponding pages.
3.How to customize DrawerNavigator drawer
DrawerNavigator giving a property called "contentComponent". It is used to create a user customizable component.
"contentComponent" accepts React component as an input and render it on DrawerNavigator drawer.
First we need to create a Menu.js
import React, { Component } from "react";
import { NavigationActions } from "react-navigation";
import { ScrollView, Text, View, StyleSheet } from "react-native";

class SideMenu extends Component {

  navigateToScreen = route => () => {
    const navigateAction = NavigationActions.navigate({
      routeName: route });
    this.props.navigation.dispatch(navigateAction);
  };

  render() {
    return (
      <View style={styles.container}>
        <View style={styles.headerContainer}>
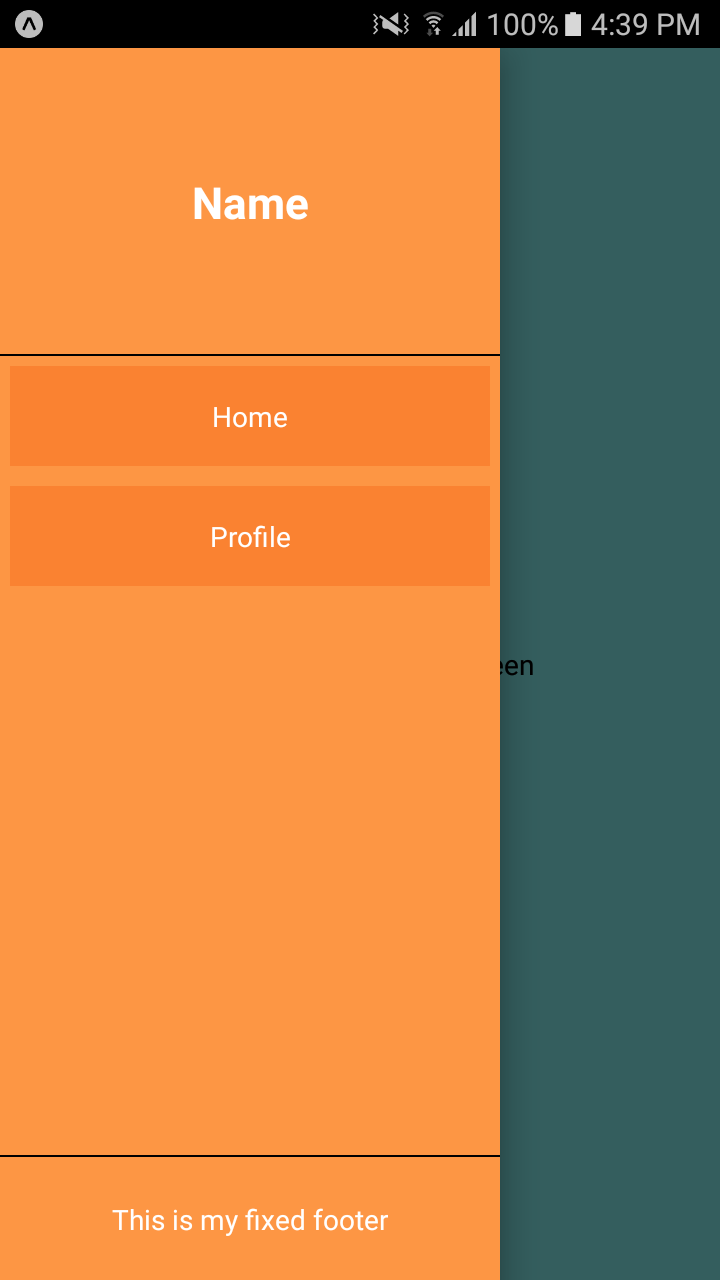
          <Text style={{ fontSize: 22, fontWeight: "600", color: "white" }}> Name </Text>
        </View>
        <ScrollView style={styles.scrollview}>
          <View style={styles.menuView}>
            <Text style={styles.menuText} onPress={this.navigateToScreen("Home")}> Home </Text>
          </View>
          <View style={styles.menuView}>
            <Text style={styles.menuText} onPress={this.navigateToScreen("Profile")}> Profile </Text>
          </View>
        </ScrollView>
        <View style={styles.footerContainer}>
          <Text style={{ color: "white" }}>This is my fixed footer</Text>
        </View>
      </View>
    );
  }
}
export default SideMenu;
Set Menu component as a value to DrawerNavigator property "contentComponent".
import React from "react";
import { View, Text, Button, StyleSheet, Image } from "react-native";
import { DrawerNavigator } from "react-navigation";
import SideMenu from "./Menu";

class Home extends React.Component {....}
class Profile extends React.Component {.....}

export default DrawerNavigator(
  {
    Home: {
      screen: Home
    },
    Profile: {
      screen: Profile
    }
  },
  {
    contentComponent: SideMenu,
    drawerWidth: 250
  }
);
And the result will be like.
